
We’ve made a lot of progress with the house, although most of it has been in my head! After the Passive House training, I had some important decisions to make before we could move forward with the design. So I spent a couple of months mulling over different options and comparing prices.
I’ve decided to square off the house and remove the two bump outs that we had in the master bedroom and bath. This will make it much easier to create a continuous air barrier and continuous insulation without any thermal bridging.
And it breaks my heart to say this, especially after writing a whole post about saving it, but after much deliberating and weighing options and prices, I’ve decided to take down the magnolia tree. We were planning on putting the house on piers in order to not disrupt the root system of the tree. The tree would have to be trimmed significantly either way, so the house could fit under it. But I talked with a foundation company regarding the price, and the piers themselves would cost around $7-8,000, and on top of that we have to get a structural engineer involved, then pay for lumber for the floor joists and the cost of a finished floor. All of which could cost three to four times more than using an insulated slab for the foundation. Because the slab will be insulated, we can also use the concrete floors as our finished floor; it creates a cool, industrial look! And we get the benefit of being coupled with the ground, which can help on heating and cooling costs since the ground is cooler than the air in summer and warmer than the air in winter. And unfortunately because of how far down we have to dig for the slab foundation, I don’t think the tree would survive the trauma to its roots.
A few weeks ago, I was at a gas station pondering my tree decision. I looked over to my left and saw a big truck that said “Gil’s Tree Service.” I remembered that they had taken a tree down for me when I was building my first home. I stopped Gil and asked his advice on the Magnolia tree. He went and looked at the tree and thought it would be a good idea to take it down. AND he has a sawmill and can mill the wood from the tree so that I can use it in the interior of the home, either to do some cool trim details or possibly a whole wall of magnolia wood! Knowing that helped me feel a lot better about the decision!
Another difficult decision has been deciding on the best option for domestic hot water. The Passive House standard has mostly been used in cooler, dryer climates, so the challenge we face with building this kind of house in the deep south is heat and humidity. We want the Relative Humidity in the house to stay between 40-60%, and some of the Passive Houses in the south have struggled stay in that range in the summer time. The Energy Recovery Ventilator and the heat pump mini-split haven’t been quite enough to keep the homes cool and deal with the humidity in the middle of summer.
I’m hoping that I can use a heat pump water heater to help with that. A heat pump water heater pulls heat and humidity out of the air and uses it to heat the water. It’s kind of like a water heater and an air conditioner in one because once the heat has been removed from the air, it blows cold air back out into the space around it. It can be 2-3 times more efficient than a standard electric water heater because it’s much more efficient to transfer energy or heat than to generate it. And if it’s really cold in the winter, you can change it to electric resistance mode. Currently the price of these water heaters is around $900, so it’s a pretty affordable option. The question was then where to put this water heater. They recommend about 1,000 cubic feet of space, which we didn’t really have with our current design! Originally the office on the first floor was going to be open to above, but we’ve decided to place a floor above the office space and use that as our mechanical room. We can have the ERV, hot water heater and possibly the electrical panel in that room.
My hope is that the ERV and the mini-split, together with the heat pump water heater and the concrete slab coupled with the ground, will be enough to keep the house cool with the humidity levels under control in the summer!
For the insulated slab, we use a couple of inches of foam underneath the slab. The foam acts as the form that you can pour the concrete into, and then the foam just stays in place after pouring and doubles as insulation! We have a layer of poly that runs under the slab and comes around to be taped to the outside of the OSB sheathing, creating a continuous vapor barrier and an air barrier.
The wall that I plan on using for any construction geeks out there is a 2×6 stud wall on 2 foot centers, with dense packed cellulose in the wall cavity. The OSB will be the sheathing that attaches to the outside of the 2×6 wall. The OSB is then sealed with a liquid flashing called Prosoco, which creates an air and vapor barrier.
Attached to the OSB, we’ll have 3-4 inches of exterior insulation, probably Rockwool, which is made from industrial slag. It’s a pain to install but it’s non organic, so it handles moisture well and doesn’t attract bugs because there’s nothing for them to eat! It can also be obtained locally because we have a manufacturer in Leeds!
On top of the Rockwool, we’ll have furring strips, (which are wood strips) that attach through the Rockwool to the studs, so that we can create a rain screen or drainage plain. At the bottom we’ll have a screen to keep insects out and towards to top of the wall, we’ll place another vent so that the air can circulate and dry out the area. The hardi-plank siding will be attached to the furring strips and that’s it!
So next we have to figure out how to tie the roof into this wall system without raising the overall height of the house too much. We could do an unvented roof, which means we just have to be extra careful about condensation issues. We have to make sure that our dewpoint won’t happen on the interior of our house, creating a moisture problem. J
Rebecca is currently working on the window schedule, which is a list of windows and sizes that we’ll use in the house, so that I can get window pricing. I’m comparing prices with a few different window manufacturer’s. She’s also making the changes to the elevations and floorplan, so we can begin inputting all the data into the Passive House Planning Package software to make sure we’re on track with the Passive House standards!
Here are a few pics of some Passive House projects we saw when I went out to the Passive House conference in Boulder last month! More to come soon!
-

- GE heat pump hot water heater in a Boulder Passive House.
-
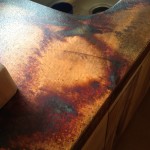
- Oxidized steel countertop- beautiful and only $44/ square foot!
-
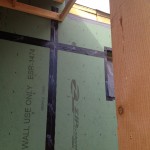
- zip wall, another alternative for creating an air and vapor barrier
-
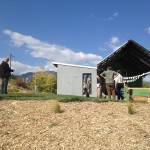
- An old mining shack in Boulder that a couple has slowly been turning into a beautiful Passive House. They had just gotten married in their backyard a few weeks earlier!
-
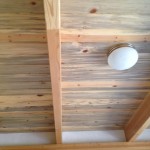
- Ceiling made from Beetle kill wood in Boulder Passive House. Supposedly, the beetle kills the pine and then a fungus gets in the wood and creates the blueish color.
-
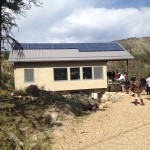
- Beautiful Passive House in the mountains outside of Boulder that was built recently after the original home was destroyed in a forest fire.